


 Near space launches require the
handling of 150 pound tanks of helium. Near space launches also involve not
insignificant sums of money. A 1200 gram latex weather balloon costs $50. The
helium to fill this balloon costs about $100 (two tanks, each at $50). So that
we don't risk injury and lose a $50 balloon and 320 cubic feet of helium, TVNSP
follows the following rules.
Near space launches require the
handling of 150 pound tanks of helium. Near space launches also involve not
insignificant sums of money. A 1200 gram latex weather balloon costs $50. The
helium to fill this balloon costs about $100 (two tanks, each at $50). So that
we don't risk injury and lose a $50 balloon and 320 cubic feet of helium, TVNSP
follows the following rules.
- Place a bed sheet on the ground as a soft ground cloth
- Have no sharp objects or cigarettes near the balloon
- Lay the helium tanks on their sides
- Unroll and untwist balloons fully by hand before filling
- Tape the filler nozzle to the balloon's nozzle before opening the tank
- Handle the balloon as little as possible
- Wear soft cotton gloves if handling the balloon
- Know how much helium you need to fill the balloon with
- Wrap all knots in the load line with a piece of tape
Helium Tanks
Some states (all states?) require MSDS be carried when transporting helium
tanks. When transporting helium tanks, make sure the tanks cannot drop on to the
ground. A 20,000 PSI tank of compressed helium without a top makes a pretty
dangerous missile. Tanks should be transported in an open bed. Transport helium
tanks such that they cannot roll around. When possible, two people should work
together moving helium tanks. This prevents dropped tanks and hernias. Around
the launch site, lay helium tanks on their side.
Filling Balloons
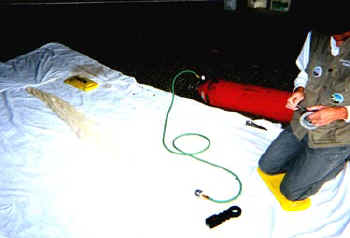
Place a clean ground cloth on the floor before opening the bag containing the
balloon. Make sure the surface of the ground cloth is free of debris. Dirt and
pebbles can damage the surface of a latex balloon leading to premature failure,
possibly even before launch. The ground cloth used by TVNSP is made from several
bedsheets sewn together. After laying out the ground cloth, roll the helium
tanks close by, as the filler hose is only six feet long. Open the valve cover
of the tanks and attach the filler hose hand tight. There is no need to attach
the filler hose with a wrench. No sharp objects should be near the filling site.
This includes jewelry like rings and bracelets. Scissors, which are needed to
cut cords, must be used well away from the balloon. Smoking is not permitted
around the balloon either. While helium is not explosive, a hot cigarette
bursting a balloon is liable to lead to explosive tempers!
The following tools and materials need to be close at hand before filling the
balloon.
 | Electronic Fish Scale
| Four Feet of Sisal Cord
| Gray Tape
| Metal Ring
| Twenty to Thirty Feet of Load Line |
| | | |
Double over the sisal line and use a lark's head knot to attach the metal ring.
Lay this aside. While the balloon is being filled, other team members will be
prepping the capsules and other team members will be prepping the parachute. Prepping
the nearcraft capsules involves things like opening camera covers, connecting
link lines between capsules, and powering up nearcraft systems. Prepping a
parachute consists primarily of untwisting its shroud lines. One end of the load
line is tied to the parachute's apex through a bearing swivel. Give all knots in
the load line a wrap of tape.
Laying Out The Balloon
The bag containing the balloon is held shut with a rubber band, so no tools are
required to unpack the balloon. The balloon handler must wear soft cotton gloves
when handling the balloon, as there is a belief that skin oils can weaken the
latex of the balloon. In addition, rough skin can abrade the balloon skin. Open
the bag and carefully unroll the balloon. Completely unroll the balloon. Don't
let inflowing helium do this, as rushing helium has less control than a person.
Slide the filling nozzle into neck of the balloon. Use a wrap of tape around the
nozzle and filler to secure the balloon neck to the filler. At least two people
should monitor the balloon as it fills. A third person needs to control the
tank. Ensure there is at least eight feet of clearance in all directions. Remove
all stationary objects that pose a risk to the balloon. Be sure to check
overhead. The balloon will reach over ten feet above the ground when being
filled and moved.
The Helium Dump
Before filling begins, balloon crews need to know the amount of helium that
needs to be dumped into the balloon. Typically the amount of lift the balloon
generates will be two or three pounds greater than the weight of the nearcraft
and parachute. Write the amount of lift needed were filling crews can see it.
Open the tank slowly and begin to let the balloon fill. Watch that the balloon
is not twisted as the helium begins to flow in. Once the balloon begins to float
the tank can be opened fully. Monitor the progress of the balloon fill
constantly. The balloon can never be left unattended during filling. Also be
aware of the balloon's location when near it. It is easy to forget when on your
hands and knees, while filling the balloon, that the balloon is close by and end
up bumping your head against it.
Measuring Balloon Lift
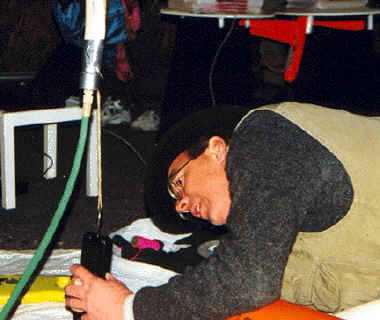
Throughout the filling
process, monitor the lift of the balloon with the electronic fish scale. The
scale has a power saving feature. So it will probably need to be switched on
ever time crews make a measurement. To operate the scale, hold it upside down by
its metal hook and press the ON button. Let the scale zero its self out. Once
the scale reads zero, it is ready to make a measurement. Once person holds on to
the filler nozzle while the second person connects the scale's hook over the
cord loop on the filler. Carefully let the balloon lose so it's pulling up on
the filler and scale. The person holding the scale needs to be prepared for the
lift of the balloon. Do not let the balloon get out of hand when holding it down
with the scale. Now read the balloon's lift on the scale.
Switching Tanks
The first tank of helium will usually empty before the balloon is filled. The
empty tank of helium will need to be switched for a full tanks. Follow these
steps when changing tanks.
- Shut off the empty tank
- Grab the balloon nozzle, above the filler, and squeeze the neck tightly
- Unscrew the valve from the empty tank, there should be no lose of helium
from the balloon
- Roll the empty tank out of the way and roll the full tank into position
- Screw the valve back into the full tank
- Release the neck of the balloon, no helium should escape the balloon and
filler
- Open the new tank of helium
Sealing The Balloon
 Once the balloon is close to
being filled, close down the tanks and finish filling the balloon slowly. Make
more frequent measurements of balloon lift. When finished, shut off the tank.
Grab the neck of the balloon and squeeze it tight, as you are about to remove
the balloon from the filler. If you let the balloon lose, it will take off
across the room shooting helium out its neck. A second person will now untape
the nozzle, releasing it from the filler. Twist the nozzle a couple of times and
tie the sisal cord around the neck. Tie the sisal such that it has a large loop
with the metal ring at the bottom. Fold the nozzle up and over itself. Leave the
loop of sisal dangling beneath the folded over nozzle. Now use gray tape to
cover the nozzle. Wrap all the way around the nozzle covering the open end of
the nozzle. Remember that there is only a couple extra pounds of lift in
the balloon, so don't use a couple pounds of gray tape to wrap around the
nozzle. When the nozzle is finished being wrapped, there will be no exposed
opening of the balloons neck. The sisal loop will also be left hanging out from
the bottom of the gray tape. At the bottom of the sisal loop will be the metal
lanyard ring. If needed, the balloon can now be connected to the valve of a
helium tank. This allows balloon handlers to rest after having to hold the
balloon down. Tie one end of the load line to sisal loop. The other end of the
load line is tied to the apex of the parachute.
Once the balloon is close to
being filled, close down the tanks and finish filling the balloon slowly. Make
more frequent measurements of balloon lift. When finished, shut off the tank.
Grab the neck of the balloon and squeeze it tight, as you are about to remove
the balloon from the filler. If you let the balloon lose, it will take off
across the room shooting helium out its neck. A second person will now untape
the nozzle, releasing it from the filler. Twist the nozzle a couple of times and
tie the sisal cord around the neck. Tie the sisal such that it has a large loop
with the metal ring at the bottom. Fold the nozzle up and over itself. Leave the
loop of sisal dangling beneath the folded over nozzle. Now use gray tape to
cover the nozzle. Wrap all the way around the nozzle covering the open end of
the nozzle. Remember that there is only a couple extra pounds of lift in
the balloon, so don't use a couple pounds of gray tape to wrap around the
nozzle. When the nozzle is finished being wrapped, there will be no exposed
opening of the balloons neck. The sisal loop will also be left hanging out from
the bottom of the gray tape. At the bottom of the sisal loop will be the metal
lanyard ring. If needed, the balloon can now be connected to the valve of a
helium tank. This allows balloon handlers to rest after having to hold the
balloon down. Tie one end of the load line to sisal loop. The other end of the
load line is tied to the apex of the parachute.
You have successfully filled a balloon. Now don't let anyone go near it!